Today, DevTools are ubiquitous when developing web apps because of their ability to inspect, debug, modify, automate, and more. While it can sometimes seem that having many distinct DevTools is unnecessary, each tool falls at a different point on the spectrum of developer needs. As needs become more specialized and focused, so do the tools. For example, Chrome DevTools focuses on the building blocks of any web app: HTML, CSS, and JavaScript. However, when working with something like React, it doesn’t offer any insight into the components being rendered or their props. Instead, React provides its own DevTools to work with components and props. In fact, it’s possible for DevTools to operate at an even more specific level. However, such tools are often overlooked because these needs are usually app-specific.
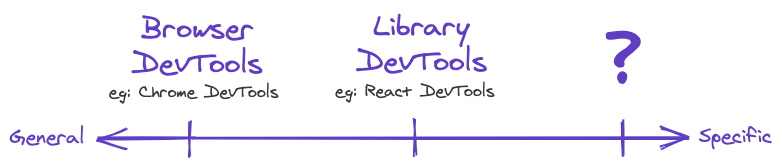
Throughout development, we frequently fill forms, create fake users, log in, or simulate other user interactions. Each of these tasks may only take a few seconds, but this quickly adds up. What if there were DevTools that operated at this more specific level?
Custom DevTools
By creating custom DevTools specific to an app, they can operate at an even higher abstraction to handle things like user interactions, or debugging tracking events. While this requires building and maintaining the custom DevTools, it also means it can be tailored to the needs of the app and engineers to streamline development.

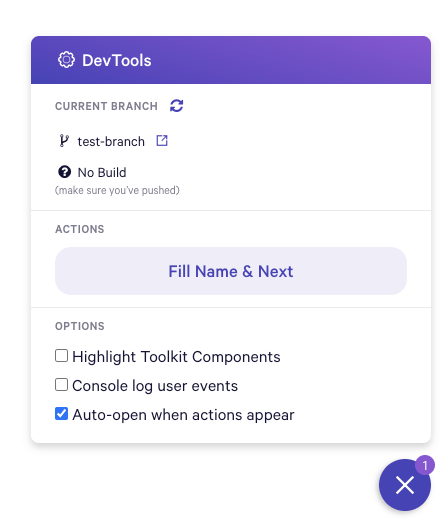
For example, our custom DevTools provides general information about the current git branch as well as Continuous Integration build status. There is also a section for contextual actions – such as filling a name input – that only appear if the action can be performed on the given page. Finally, there are a few options to highlight the components on the page within the design system, log tracking events, and auto-open the custom DevTools anytime a new action appears. As our needs change and the app changes, the custom DevTools evolve too.
Implementation
There are many ways custom DevTools could be implemented. For example, it could be a browser extension or built directly into the app. At Wealthfront, we decided to build it directly in the app to avoid the downsides of browser extensions. A browser extension would require additional tooling, has limitations interacting with the page, is browser specific, and requires installation. On the other hand, building DevTools in the app can take advantage of the existing tooling, works in any browser, and requires no additional installation.
Our custom DevTools starts with a single file that can be imported on any page in the app and initialized by invoking the install function it exports. This appends a new element to the document body and renders a React component. This component contains all the features and functionality.
import React from 'react';
import ReactDOM from "react-dom";

function DevTools() {
  return <div>You now have your own DevTools!</div>;
}

export function install() {
  const devToolsRoot = document.createElement("div");
  document.body.appendChild(devToolsRoot);
  ReactDOM.render(<DevTools />, devToolsRoot);
}
Code language: JavaScript (javascript)
Rather than using a standard static import, the custom DevTools are imported using a dynamic import. With this approach, bundlers like webpack can split this into its own chunk to reduce bundle size. This way it can be conditionally imported, for example only in the development environment.
function loadDevtools() {
  if (process.env.NODE_ENV === 'development') {
    return import('dev_tools').then((devTools) => devTools.install());
  }
}
Code language: TypeScript (typescript)
These code snippets provide a basic skeleton to add features to DevTools.
Features
Below are several examples of custom DevTools features that we’ve added over time and have found useful at Wealthfront.
User Actions
One of the first things added were functions to perform different user actions. For example, if there was a field for first and last name, the function could find the input element based on the label text and fill it using the Testing Library package. However, this quickly became problematic as the list of actions grew. Most actions are specific to one page, but would always show up. Instead of always showing all actions, logic was added to only show actions that were relevant to that page.
The actions started to all follow a similar basic pattern. First, determine if the action is relevant to the current page. Next, show a button to perform the action if it is relevant. Finally, add logic to perform the action on the current page when the button is clicked. As a result, we standardized a general API to perform any action:
canPerform– can this action be performed given the current state of the app? For example, to fill a name, does an input with “first name” and “last name” exist on the page?name– the prompt displayed in the button to trigger the action. For example, to fill a name and continue to the next step it would be “Fill Name & Next”.perform– perform the action. For example, find the “first name” and “last name” input and fill each.
// actions/name.ts
import { screen } from '@testing-library/react';
import userEvent from '@testing-library/user-event';

export function canPerform() {
  try {
    return !!screen.getByLabelText(/first name/i) && !!screen.getByLabelText(/last name/i);
  } catch (error) {
    return false;
  }
}

export async function perform() {
  try {
    await userEvent.type(await screen.findByLabelText(/first name/i), 'Wealth');
    await userEvent.type(await screen.findByLabelText(/last name/i), 'Front');
    await userEvent.click(await screen.findByText('Next'));
  } catch (error) {
    // handle the error
  }
}

export const name = 'Fill Name & Next';
Code language: TypeScript (typescript)
Then, this action is imported into an actions index file with all the other actions. This contains a list of all the possible actions and helpers to determine which actions are relevant to the current page. A new action can be quickly added by defining the three exports and adding it to this list.
// actions/index.ts
import * as name from './actions/name';
// other action imports ...

export interface Action {
  name: string;
  canPerform(): boolean;
  perform(): void;
}

const ACTIONS: Action[] = [
  name,
  // other actions...
];

export function calculateActions(): Action[] {
  return ACTIONS.filter((action) => action.canPerform());
}
Code language: TypeScript (typescript)
From here the DevTools determines which actions to show by calling calculateActions. Unfortunately, things can change on the page in any number of ways. To handle this, the DevTools uses a MutationObserver so any time anything on the page changes, it recalculates what actions can be performed. Finally, this is all wrapped up in a useActions React hook that can be consumed by a component to render the relevant actions as buttons in the DevTools.
import { Action, calculateActions, arrayContentsEqual } from './actions';

export const useActions = (): Action[] => {
  const [actions, setActions] = React.useState(calculateActions());

  React.useEffect(() => {
    function callback() {
      const newActions = calculateActions();
      if (!arrayContentsEqual(newActions, actions)) {
        setActions(newActions);
      }
    }

    const observer = new MutationObserver(callback);
    observer.observe(document.body, { childList: true, subtree: true });

    return () => observer.disconnect();
  });

  return actions;
};
Code language: TypeScript (typescript)
Now, if there are fields with a label of “first name” and “last name” the action will be displayed and performed by clicking the button. This pattern has worked well for quickly adding new actions and only showing the ones that are relevant. It’s also flexible and handles a broad range of actions, well beyond filling an input.
Current Branch & Build Status
Custom DevTools can do more than simulate user actions. It can also aggregate other useful information. It displays the current git branch (for those pesky times something isn’t working as expected only to realize it’s the wrong branch) and the branch’s build status (running, success, failure). This metadata requires git commands and API calls so it’s provided by an endpoint. There’s a simple method defined to retrieve the current git branch with Ruby.
def current_branch
  `git rev-parse --abbrev-ref HEAD`.strip
end
Code language: Ruby (ruby)
Component Highlighter
At Wealthfront, we’ve developed a standardized set of components such as cards, buttons, and typography as a part of our design system. It’s not always obvious which content is a component from the design system and which is not. The DevTools has a “component highlighter” option to solve this. When this option is enabled, it will draw a box around any component in our design system. This allows engineers, designers, product managers, and others to quickly see which components are from the design system. It can help surface which pages should rely more on design system components, or where there may be gaps in component coverage.
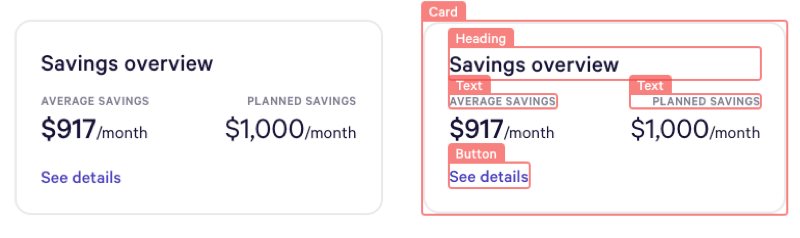
To achieve this, each component in the design system has a custom data attribute on the underlying element that it renders so that it can be used to query by. A temporary highlighter element is created that surrounds the underlying component element. This solution isn’t perfect, but strikes a good balance between simplicity and solving this use case. With this approach, there’s nothing React specific, so it can work with any design system.
const HIGHLIGHT_WIDTH = 2;
const HIGHLIGHT_SELECTOR = '[data-component]';

function createHighlighterForElement(component: HTMLElement) {
  const highlighter = document.createElement('div');

  const { x, y, width, height } = component.getBoundingClientRect();
  highlighter.style.cssText = `
    top: ${y + window.scrollY - HIGHLIGHT_WIDTH}px;
    left: ${x - HIGHLIGHT_WIDTH}px;
    height: ${height}px;
    width: ${width}px;
    border: ${HIGHLIGHT_WIDTH}px solid red;
    position: absolute;
  `;

  return highlighter;
}

function highlightComponents() {
  const components = document.querySelectorAll<HTMLElement>(HIGHLIGHT_SELECTOR);

  components.forEach((component) => {
    const highlighter = createHighlighterForElement(component);
    document.body.appendChild(highlighter);
  });
}
Code language: TypeScript (typescript)
Local User Management
Finally, when developing locally, we often need to test users in a variety of states. This requires manually creating multiple different users. Previously, this required clicking through our signup flow, or using the command line. The first approach is an easier but slow process, while the second is much faster but requires passing the correct arguments.
Now, the DevTools streamline both of these flows. First, actions can be created for each step of the signup flow, which makes it much quicker. Second, a basic UI was added to replace the CLI for local user creation and management. Since these are fake users that only exist in our local environment the credentials can be stored in the browser’s local storage for easy retrieval to quickly switch between different fake users.
Conclusion
While there are many different DevTools freely and readily available, building your own custom DevTools can be a far more effective way to automate tedious app-specific development chores. This post has highlighted a number of DevTools features we’ve built and found useful in our local development at Wealthfront. The next time you find yourself performing a repetitive task, feeling something takes a few too many clicks, or thinking there’s other useful information that could be better surfaced, perhaps it’s the right time to add custom DevTools of your own.
Disclosure
This communication has been prepared solely for informational purposes only. Nothing in this communication should be construed as an offer, recommendation, or solicitation to buy or sell any security or a financial product. Any links provided to other server sites are offered as a matter of convenience and are not intended to imply that Wealthfront or its affiliates endorses, sponsors, promotes and/or is affiliated with the owners of or participants in those sites, or endorses any information contained on those sites, unless expressly stated otherwise.
Wealthfront offers a free software-based financial advice engine that delivers automated financial planning tools to help users achieve better outcomes. Investment management and advisory services are provided by Wealthfront Advisers LLC, an SEC registered investment adviser, and brokerage related products are provided by Wealthfront Brokerage LLC, a member of FINRA/SIPC.
Wealthfront, Wealthfront Advisers and Wealthfront Brokerage are wholly owned subsidiaries of Wealthfront Corporation.
© 2020 Wealthfront Corporation. All rights reserved.