App modularization is the process of spitting a monolithic architecture into much smaller components with high cohesion and low coupling. In layman’s terms, chopping down a very large codebase into smaller digestible (ideally independent) pieces that share a common responsibility. Our main goal was to improve the incremental build times of the application to boost developer productivity and experience. This involved making changes to the configuration of our build system, refactoring existing code and revising our architecture. In this series of blogs, I will go over the motivation of the project and the various phases of the implementation in detail. This series assumes that you have a fair bit of knowledge about Gradle, Dagger, and architecture about android. If not, feel free to give this a read but also reference the source materials about the relevant framework to better understand whenever necessary.
Motivation
Faster incremental build and test run times
As the codebase grew along with the number of developers working on it, we started seeing an exponential increase in our build times. It grew to a frustratingly long time such that even when running unit tests, Gradle would need to re-compile the entire app which takes anywhere from 2 to 3 mins. This ended up making the feedback loop longer and trigger a context switch every time we built the app. Because of our growing frustration, we decided that we should invest in reducing the build times of the app.
We had a goal of reducing the incremental build time by 50% to bring it down to a manageable level. With our team size at the time, this promised a savings of 22.5 developer hours per week. And since then, we have doubled the team.
Faster build times on CI
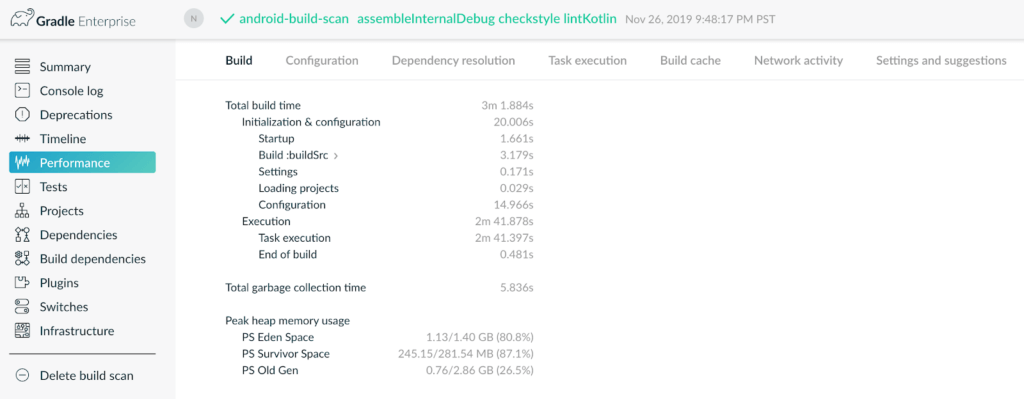
We run multiple types of builds (Mock api integration tests*, Real api integration tests**) for the same branch in our CI pipeline before it gets into master and this inherently takes time. Our motivation was to reduce the amount of time the developers have to wait for their branch builds. Gradle offers a great way to parallelize the tasks running in a build. This can be enabled by a flag and we saw much more effective parallelization as we added more independent modules to our app.

The image above represents the execution of tasks in our modularized CI builds. As you can see, Gradle is able to effectively parallelize the tasks (irrespective of the type of task) and utilize all the cores of the CPU. Modularization allows for the same tasks to be broken down into smaller pieces in each module and slotted in at different times to be built in parallel. To contrast, here’s a build scan when we had a single module,

* Mock api integration tests – Integration tests that work with a mocked version of our API returning fake data instead of real responses. This reduces the huge flakiness factor of network calls resulting in much more stable integration tests.
** Real api integration tests – Integration tests that integrate with a fake version of our production server that returns real responses. This gives us confidence that our entire stack works as intended.
Prototyping
Here at Wealthfront, for any significant change or feature, we have a process called Design Doc review where we review the goals, invariants, proposed design and implications with senior members at the company. As a part of that, we wanted to develop a proof-of-concept to test out the hypothesis that modularizing the build would improve the incremental compilation times of the app. After a lot of trial and error, we were able to create a small working module with a couple of screens and ran some profiling on it. This module confirmed our hypothesis: we saw that unit tests that usually take ~2 mins to run now took ~3-10 secs, which was incredible. Now that we had a working prototype, we were confident that we were going in the right direction.
Project execution
In terms of the project execution, we expected the project to be pretty large in scope, so we broke down the project into multiple phases to de-risk the project.
Phase 1 – Setting up plugins and preventing regression
In the initial phase of the project, we wanted to have all our common setup for static analysis, unit tests, and custom Gradle logic unified in plugins so that they could be reused across modules. This makes sure that any configuration that we had for the root module gets applied to the new modules that we created.
Static analysis plugin
Our codebase consists of both Java and Kotlin files so we use the checkstyle plugin for Java and a combination of ktlint and detekt for our Kotlin static analysis. Here’s the plugin where these are configured
apply plugin: 'io.gitlab.arturbosch.detekt'
apply plugin: 'org.jmailen.kotlinter'
apply plugin: 'checkstyle'

checkstyle {
 toolVersion = "8.28"
}

task checkstyle(type: Checkstyle) {
 source("src")
 include("**/*.java")
 exclude("**/gen/**")
 classpath = files()
 configFile = new File("$rootDir/config/checkstyle/checkstyle.xml")

 tasks.findByName("check")?.dependsOn("checkStyle")
}

kotlinter {
 indentSize = 2
 continuationIndentSize = 2

 tasks.findByName("lint")?.dependsOn("lintKotlin")
}

detekt {
 version = Version.detektVersion

 input = files("$projectDir/src/")
 config = files("$rootDir/config/detekt/detekt-config.yml")
 filters = ".*test.*,.*/resources/.*,.*/tmp/.*"

 tasks.findByName("check")?.dependsOn("detekt")
}

tasks.withType(Test) {
 reports {
   html.setEnabled(true)
 }
}

// applying the plugin to all the modules

allprojects {
  apply from: "$rootDir/gradle/static-analysis.gradle"
}
Code language: Groovy (groovy)
We also had a similar plugin to configure all our android plugin configuration such as our product flavors, test options, and lint options. These plugins would be included in all the new modules that were about to be created and could share all the configuration from this centralized location.
Buildscan – Reporting
Gradle’s Build Scan plugin helped us understand what exactly happens inside our builds and gives us an in-depth look into our build timeline, performance, dependencies, and cache hits.
We created a Jenkins job to keep track of our build times and alert us about any spikes or abnormalities in the times as a way of preventing regression. This way if we ended up affecting the performance of our build process as a part of any project, we would know about it proactively.
Build cache – Caching
In order to further improve the performance of the build times, we used the caching system provided by Gradle (Build cache). When build cache is enabled, Gradle reuses the output of previous tasks’ execution – unless there was a change in that task’s input. Most of our builds fell into this category, which meant that we benefited a lot from this change. This can be enabled in your Gradle build by enabling the following flag in gradle.properties
org.gradle.caching=true
Code language: JavaScript (javascript)
When integrating build cache in our codebase, we hit a couple of roadblocks which caused some issues in our build toolchain. Butterknife is an android view binding library that utilizes annotation processing to generate the boilerplate binding code. But with Build cache, Butterknife started having issues where cleaning the builds would leave some artifacts behind and this would randomly cause the app to crash when inflating a layout. We could not find a straightforward way to fix the issue so we decided it might be better to migrate away Butterknife completely as we did not want to give up the build time gains that we got from using the build cache. It seemed like an extreme solution at first but we were able to build a simple replacement with kotlin delegates and migrate the existing code with a small script. This delegate can be used to bind views in the same manner as with Butterknife without any annotation processing. This also helped speed up the build when working with views.
fun <T : View> View.bindView(@IdRes res: Int): MutableBindViewDelegate<T> {
  return MutableBindViewDelegate(lazy(LazyThreadSafetyMode.NONE) { findViewById<T>(res)!! })
}

class MutableBindViewDelegate<T>(private val lazy: Lazy<T>) {

  private var value: T? = null

  operator fun getValue(thisRef: Any?, property: KProperty<*>): T {
    return value ?: lazy.getValue(thisRef, property)
  }

  operator fun setValue(thisRef: Any?, property: KProperty<*>, value: T) {
    this.value = value
  }
}

// Usage:
var title: TextView by bindView(R.id.title)
var body: TextView by bindView(R.id.body)
var ctaButton: Button by bindView(R.id.ctaButton)
var tagView: TextView by bindView(R.id.tagView)
Code language: Kotlin (kotlin)
BuildSrc – Dependency Management
We used build src to organize our dependencies in a typesafe object so that they are reused across the modules. It also housed custom plugins that we had for our integration tests.
object Libs {

  val kotlinGradle = "org.jetbrains.kotlin:kotlin-gradle-plugin:$kotlinVersion"
  val kotlinterGradle = "org.jmailen.gradle:kotlinter-gradle:$kotlinterVersion"
  val kotlinAllOpen = "org.jetbrains.kotlin:kotlin-allopen:$kotlinVersion"
}

object Version {

  val minSdkVersion = 23
  val targetSdkVersion = 28
  val javaVersion = JavaVersion.VERSION_1_8
  val kotlinVersion = "1.3.61"
}
Code language: Kotlin (kotlin)
Next up
In the first part of the blog series, we gave a high-level overview of build modularization, its benefits, how prototyping was useful for the project and phase 1 of the execution. In the next blog post, we will be dealing with how new features are built in their own module and dealing with multiple dagger components and type-safe multi-module navigation.
Continue reading the next post of this series here.
Disclosure
This blog is powered by Wealthfront Corporation (formerly known as Wealthfront Inc.). The information contained in this blog is provided for general informational purposes, and should not be construed as investment advice. Any links provided to other server sites are offered as a matter of convenience and are not intended to imply that Wealthfront Corporation endorses, sponsors, promotes and/or is affiliated with the owners of or participants in those sites, or endorses any information contained on those sites, unless expressly stated otherwise.
Wealthfront Corporation may from time to time publish content in this blog and/or on this site that has been created by affiliated or unaffiliated contributors. These contributors may include Wealthfront employees, other financial advisors, third-party authors who are paid a fee by Wealthfront, or other parties. Unless otherwise noted, the content of such posts does not necessarily represent the actual views or opinions of Wealthfront or any of its officers, directors, or employees. The opinions expressed by guest bloggers and/or blog interviewees are strictly their own and do not necessarily represent those of Wealthfront Corporation.
© 2020 Wealthfront Corporation. All rights reserved.