In the previous blog post, we looked at how the project was initially set up, and now we will take a look at how we started organizing features into Gradle modules. To ensure a consistent bucketing strategy throughout the migration period, we decided that it would be ideal to place any new code inside dedicated feature modules. We decided if we didn’t stop the inflow of more code into the root module, we would have to keep modularizing the new incoming code as well. This approach eventually helped us save a ton of time by not having to refactor new code.
Phase 2 – New features into separate modules
Type-safe Navigation
At Wealthfront, we have a single activity architecture for our application and we use our in house navigation library called “Magellan”. To learn more about our motivations of why we use Magellan and how it works, see this link here. In this model, we have screens that contain business logic and views attached to those screens that have UI logic. Together, these two components mostly make up what the user sees on a specific screen. Screens are the objects that survive configuration changes and are navigable to. Like so
override fun showLogin() {
  navigator.goTo(LoginScreen())
}
Code language: Kotlin (kotlin)
Here’s where it gets tricky, each one of our features contains a large number of screens and with Magellan, to navigate to a screen, we need a reference to the screen (ie. LoginScreen) in the current module. In an ideal multi-module architecture, each feature module is compiled independently from each other and this means that we will not have access to all the screens in every module. This meant that we had to develop a type-safe way for navigation in our multi-module approach. This is a constraint unique to our architecture – if we were to use activities to navigate throughout our app, we could use intents to trigger another activity in a separate module without the compiler knowing of it, by passing static strings,
val intent = Intent().setClassName(applicationId, "com.wealthfront.login.LoginActivity")
startActivity(intent)
Code language: Kotlin (kotlin)
This method of navigating is not type-safe and could easily lead to bugs. To overcome this, we developed the concept of Portal. Portal is the interface that provides type-safe screens to navigate to. Here’s an example of a portal in our app,
interface AuthPortal {

  fun getLoginScreen(): Screen<*>

  fun getAuthenticateBiometricScreen(): Screen<*>

  fun getConfirmBiometricScreen(
    accessToken: String,
    authenticationCallback: AuthenticationCallback
  ): Screen<*>
}
Code language: Kotlin (kotlin)
It is the responsibility of the modules to implement the Portal interface to provide the necessary screens. We could then use this portal across the app to provide us with the required screens at runtime and also enjoy the benefit of compile-time safety. We use an application-scoped Dagger component to provide the portal implementation at runtime like so
@Module
abstract class NavigationPortalModule {

  @Binds
  abstract fun provideAuthPortal(authPortal: AuthPortalImpl): AuthPortal
}
Code language: Kotlin (kotlin)
This way at runtime, all the screens would get the implementation of the portal and could navigate to the screen in a type-safe manner.
class LoginScreen : Screen<LoginView>, AuthenticationCallback {

  @Inject lateinit var authPortal: AuthPortal

  fun showBiometricConfirmation() {
    navigator.goTo(authPortal.getConfirmBiometricScreen("token", this))
  }
}
Code language: Kotlin (kotlin)
Dagger subcomponents
We use Dagger for our dependency injection needs. We use constructor injection for all infrastructure related classes and field injection for screens and views. Since we use field injection we use a component to hook up the Dagger modules and injection sites. This means that we need a reference to each of our screens/views in the component to satisfy its dependencies. For example, we had the following AppComponent in our root module.
@Singleton
@Component(modules = [
  AppModule::class,
  ApiModule::class])
interface AppComponent {

  fun inject(wealthfrontApp: WealthfrontApp)

  fun inject(activity: MainActivity)

  val authComponentFactory: AuthComponent.Factory

  @Component.Factory
  interface Factory {
    fun create(appModule: AppModule): AppComponent
  }
}
Code language: Kotlin (kotlin)
Since we’ve always had a single Gradle module for our application, we never really had an incentive to create multiple components so this ended up being a god file with reference to all the screens in the app. If we were to modularize the app, our root-level Dagger component would not be able to reference those injection sites moved to other Gradle modules.
For each module, we created a Dagger subcomponent which would be instantiated using the factory in the AppComponent in the :app module. The AppComponent still contains all the Dagger modules attached to it, and using the subcomponent factory, we can share all these dependencies with each subcomponent. Now we have a way to access all the dependencies in our modules using the subcomponent architecture. Using this, we can start using field injection in our screens/views.
@Subcomponent
interface AuthComponent {

  @Subcomponent.Factory
  interface Factory {
    fun create(): AuthComponent
  }

  fun inject(loginScreen: LoginScreen)
}
Code language: Kotlin (kotlin)
This was probably the hardest thing to figure out since there were no real guides or proper documentation for our specific use case. We also investigated component dependencies as a way of achieving the same goal but decided against it as our components were not that independent since they all used the same modules and it also required more ceremony and maintenance than the subcomponent architecture.
Creating the :legacy module
Once we established the solutions for the above constraints, we moved all of the as-yet un-modularized code to a new module called Legacy. The name signifies that it is something we could actively work to refactor and clean up retroactively.
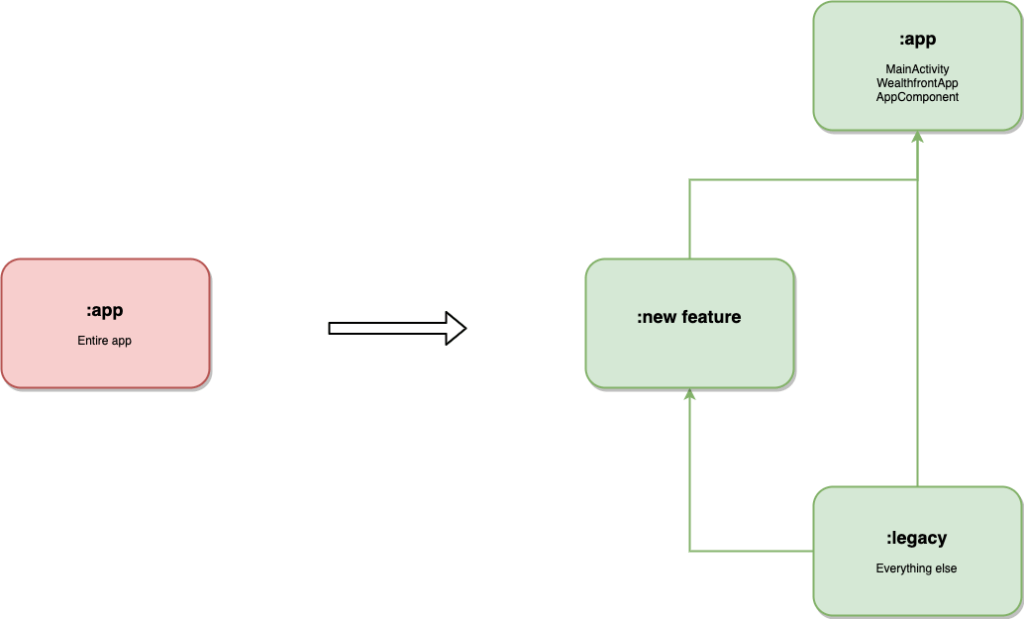
With this new architecture, we could have new modules with access to existing infrastructure by having a dependency on the legacy module. Our top-level :app module would need to have a dependency on all the other modules to successfully build the application.
When we started working on the individual modules, usually there is no ABI change in other modules, which means that the module that is being worked on is the only thing that gets compiled so we saw some pretty good improvements starting then.
What is ABI?
ABI stands for Application Binary Interface and it usually includes but is not limited to:
- Types used in super classes or interfaces
- Types used in public method parameters, including generic parameter types (where public is something that is visible to compilers. I.e. , public, protected and package private members in the Java world)
- Types used in public fields
- Public annotation types
These are the parts of the library/application that are exposed when the module is included as a dependency. And this means that anytime there is an ABI change, Gradle needs to recompile to be completely safe that there are no compilation errors or issues within the application.
Sidenote: Anytime we specify a dependency to be api dependency in Gradle, the ABI of the library will be part of the module’s ABI as well whereas including it as an implementation dependency, would mean that the ABI will not be exposed and it remains as an implementation detail of the module.
Next up
In this part of the blog series, we looked at how we solved some of our challenges with Dagger and type-safe multi-module navigation. In the next and final post of this series, we will look at how we moved our infrastructure and features into separate modules and how we automated the process of migrating the code out of the legacy module. We will also look at the build profiling numbers to see the benefit that we got out of modularizing the build. Stay tuned!
Continue reading the next post of this series here.
Read the previous part of the series here.
Disclosure
This blog is powered by Wealthfront Corporation (formerly known as Wealthfront Inc.). The information contained in this blog is provided for general informational purposes, and should not be construed as investment advice. Any links provided to other server sites are offered as a matter of convenience and are not intended to imply that Wealthfront Corporation endorses, sponsors, promotes and/or is affiliated with the owners of or participants in those sites, or endorses any information contained on those sites, unless expressly stated otherwise.
Wealthfront Corporation may from time to time publish content in this blog and/or on this site that has been created by affiliated or unaffiliated contributors. These contributors may include Wealthfront employees, other financial advisors, third-party authors who are paid a fee by Wealthfront, or other parties. Unless otherwise noted, the content of such posts does not necessarily represent the actual views or opinions of Wealthfront or any of its officers, directors, or employees. The opinions expressed by guest bloggers and/or blog interviewees are strictly their own and do not necessarily represent those of Wealthfront Corporation.
© 2020 Wealthfront Corporation. All rights reserved.